
Campground water can vary noticeably from one stop to the next. One hookup may deliver strong chlorine-related taste, while another may carry visible sediment or provide weaker flow during peak hours. An inline RV water filter can be a practical response when your goal is simple exterior filtration without permanently changing the RV plumbing.
An inline RV water filter connects directly to a compatible campground spigot, hose, or RV water inlet. It can help improve selected taste, odor, and sediment concerns depending on the filter media and verified product claims. The trade-off is that every filter adds some resistance to the water line, so pressure, flow, sediment load, and cartridge condition matter.
This guide focuses on one question: is an inline RV filter enough for your setup? You will learn when it works well, when it may restrict shower flow, where to install it, how to recognize clogging, and when a canister or drinking-water-only system may be a better choice.
Is an Inline RV Water Filter Right for You?
Choose an inline RV filter when you want compact, removable exterior filtration for chlorine-related taste, odor, or light sediment and your campground water pressure is already adequate.
Consider another setup when incoming pressure is weak, sediment is consistently heavy, several fixtures need to run together, or the main goal is specialized drinking-water treatment at one faucet.
Inline filtration is an installation format, not a guarantee of complete contaminant removal. The exact cartridge media, certification, flow rate, operating pressure, and replacement requirements determine what the filter can do.
Who an Inline RV Water Filter Is For—and Who Should Skip It
An inline RV water filter is best suited to travelers who want a compact, removable filter for campground or city-water connections. It is normally installed before water enters the RV, allowing the same supply to serve showers, sinks, toilets, and other fixtures.
An Inline RV Filter May Be a Good Fit When:
- Campground water has noticeable chlorine-related taste or odor.
- You occasionally see light sand, rust, or other visible particles.
- You want a filter that can be installed without modifying interior plumbing.
- You travel between campgrounds and need a portable exterior setup.
- You want basic filtration for all water entering the RV.
- Your incoming water pressure and flow are already adequate.
An Inline RV Filter May Not Be the Best Fit When:
- Campground pressure is already weak.
- Several fixtures must run at the same time.
- Water regularly contains heavy sediment.
- The source is an untested private well.
- You need treatment for a specific high-concern contaminant.
- The main goal is targeted drinking water at only one faucet.
- Hardness, high TDS, sulfur, or another condition requires a different treatment method.
Knowing the water source, typical pressure, available installation space, and treatment goal can prevent an inline filter from becoming an unnecessary restriction.
Quick Decision Snapshot
Choose Inline
- You want simple exterior installation.
- Taste, odor, or light sediment are the main concerns.
- You move between campgrounds frequently.
- You prefer a compact filter.
- Incoming flow is already adequate.
Choose Canister
- Sediment is a recurring problem.
- You need larger cartridges.
- Small inline filters clog too quickly.
- You want separate sediment and carbon stages.
- You stay at inconsistent water sources.
Choose Drinking-Only
- Drinking and cooking are the priorities.
- You do not want to affect shower flow.
- You want more contact time at one faucet.
- Whole-RV filtration is unnecessary.
- Exterior installation is impractical.
Why Water Pressure Is the Main Inline RV Filter Trade-Off
Every filter creates resistance as water moves through the cartridge. That resistance becomes more noticeable when:
- Campground pressure is already low.
- The hose is long, narrow, or kinked.
- Several fixtures are operating together.
- A pressure regulator is set too low.
- The cartridge has collected sediment.
- The filter media are more restrictive.
- Additional fittings create sharp bends.
A new filter connected to a strong water source may feel normal. The same filter can feel much more restrictive at an older campground or after it has collected sediment.
How to Check Whether Your RV Is Sensitive to Restriction
- Connect the hose and pressure regulator normally without the filter.
- Run the shower at the usual temperature and flow.
- Open a sink faucet briefly.
- Flush the toilet while the shower is running.
- Note whether the shower flow or temperature changes significantly.
- Install the filter and repeat the same test.
If the unfiltered setup already struggles, adding filtration will usually make the weakness more noticeable.
What to Do When Flow Drops
- Check the hose for kinks or compressed sections.
- Confirm that every valve is fully open.
- Inspect the pressure regulator setting.
- Limit simultaneous use of several fixtures.
- Check whether the cartridge has collected visible sediment.
- Replace the cartridge when approved maintenance does not restore flow.
- Temporarily bypass the filter for diagnosis.
When an Inline Filter Works Best
Inline carbon-based filtration is most useful when treated campground or city water has:
- Chlorine-related taste or odor
- Mild musty or stale taste
- Light sediment
- Small amounts of visible rust or grit
- No known treatment need outside the filter’s verified claims
It is also convenient for part-time travelers and RV owners who do not want to mount a permanent exterior canister system.
Improved taste does not prove that every health-related concern has been addressed. Choose the filter according to its exact tested or certified reduction claims.
When an Inline Filter Is Only a Basic First Step
An inline RV filter may become frustrating when the water source regularly has:
- Heavy sediment
- Cloudiness
- Frequent rust bursts
- Persistent rotten-egg odor
- Unknown well-water conditions
- Known contamination concerns
- High hardness or scale
- Very low incoming pressure
Heavy sediment can load a small filter quickly, reducing flow throughout the RV. A consistent sulfur odor may require different treatment media, more contact time, source-water testing, or a different water source. Hardness and high TDS are also separate problems that a standard inline carbon filter is not designed to solve.
When water quality is uncertain, test the source or follow local guidance rather than relying on taste and smell alone.
Inline Hose Filter vs. Exterior Canister System
Inline and canister filters can both be installed outside an RV, but they support different priorities.
| Feature | Inline Hose Filter | Exterior Canister System |
|---|---|---|
| Installation | Compact, removable, and normally quick to connect | Requires more fittings, space, and setup |
| Media volume | Usually smaller | Usually larger |
| Sediment handling | Suitable for light sediment, depending on the cartridge | Can use a larger dedicated sediment cartridge |
| Filtration stages | Often combines filtration in one compact cartridge | Can separate sediment, carbon, and other stages |
| Storage | Easier to pack | Requires more storage space |
| Flow stability | May decline sooner when sediment loads the cartridge | Larger surface area may provide more stable performance |
| Best fit | Travelers prioritizing simplicity | Frequent or long-term users facing inconsistent water |

Flow Rate vs. Filtration Depth
A more restrictive filter is not automatically better. Finer filtration or denser media may increase treatment contact but can also reduce flow or clog more quickly.
Real-world flow depends on:
- Incoming campground pressure
- Hose diameter
- Hose length
- Pressure regulator setting
- Cartridge design
- Filter surface area
- Sediment load
- Number of fixtures in use
- Condition of the RV plumbing
When campground pressure is marginal, prioritize a filter and hose layout that preserve usable flow. When pressure is strong and taste or odor is the main concern, greater carbon contact may be acceptable.
Do not compare filters using a flow-rate number alone. Confirm the pressure at which the flow was measured and consider how performance may change as the cartridge loads.
TDS Is Not the Same as Taste or Filter Performance
TDS measures the total concentration of dissolved conductive substances in water. It does not directly measure chlorine taste, odor, sediment, bacteria, or every chemical contaminant.
An activated carbon inline filter may improve chlorine-related taste and odor without causing a meaningful reduction in TDS. That does not automatically mean that the filter is failing.
For an inline RV filter, pay more attention to:
- Verified reduction claims
- Taste and odor changes
- Visible sediment
- Flow performance
- Cartridge condition
- Water-source testing when needed
Should You Filter the Whole RV or Only Drinking Water?
Filtering all water entering the RV can help with light sediment and taste across showers, sinks, toilets, and other fixtures. The downside is that the filter affects the flow available to the entire RV.
A drinking-water-only filter treats a smaller volume at one faucet. This can preserve shower flow while providing more targeted filtration for drinking and cooking.
Whole-RV Inline Filtration May Suit You If:
- You want light sediment control before water enters the RV.
- Chlorine-related odor is noticeable during showers and washing.
- Incoming pressure is adequate.
- You prefer one exterior connection.
Drinking-Water-Only Filtration May Suit You If:
- Drinking and cooking are the main priorities.
- Campground pressure is often weak.
- You want more specialized filtration at one faucet.
- You do not need to filter toilet or shower water.
- You want to avoid whole-RV flow restriction.
Some RV owners use both: a basic sediment or carbon stage outside and a more targeted drinking-water filter inside.
Cost and Replacement Planning
The true cost of an inline RV filter depends on more than the purchase price.
Include:
- Initial filter housing or cartridge price
- Replacement cartridges
- Spare cartridges carried during travel
- Frequency of campground use
- Total water used for showers, dishes, and other fixtures
- Sediment exposure
- Shipping or local availability
- Accessories such as regulators and hose adapters
Avoid assuming that a large gallon rating will be reached under every condition. Heavy sediment, high usage, poor storage, and dirty-water events can shorten practical service life.
Replacement Signs That Matter More Than a Generic Schedule
Inspect or replace the filter when:
- Chlorine-related taste or odor returns.
- Flow drops noticeably.
- Shower performance weakens.
- Filling a pot takes significantly longer.
- The cartridge reaches its rated capacity.
- The manufacturer’s replacement interval is reached.
- The filter was exposed to freezing.
- A known sediment event occurred.
- The housing or fittings show damage.
Carry a compatible spare during longer trips, especially when traveling through areas where replacements may be difficult to find.
Installation Location and Hose Routing

Most inline RV filters are installed either near the campground spigot or near the RV inlet.
Option 1: Install Near the Campground Spigot
Potential Advantages
- The hose receives filtered water.
- Sediment is captured before entering the hose.
- The regulator can protect downstream components from excessive source pressure.
Potential Limitations
- A low spigot may leave the filter resting on the ground.
- The filter can pull on the connection.
- The hose may bend sharply.
- The filter may be exposed to sun, rain, vehicles, or freezing temperatures.
Option 2: Install Near the RV Inlet
Potential Advantages
- The filter may be easier to support.
- Less weight may hang from the campground spigot.
- The cartridge may be easier to inspect.
Potential Limitations
- The hose carries unfiltered water.
- A long or rigid filter may interfere with the RV inlet.
- The compartment door may not close.
- A sharp hose bend may reduce flow.
Either layout can work when the fittings, pressure regulator, hose routing, filter orientation, and support method match the equipment instructions.
Check Clearance Before Buying
Inline filters are compact, but they still need straight clearance around the fittings.
Measure:
- Distance from the RV inlet to the compartment wall
- Space needed to turn fittings
- Space required for cartridge replacement
- Hose bend radius
- Clearance for a filter stand or bracket
- Whether the compartment door can close
- Whether the filter must remain upright
A right-angle adapter can sometimes improve routing, but every additional fitting creates another possible leak point.
Campground Pressure Swings and Sediment Events
Campground water may change during the day. Pressure can fall during peak-use periods, and maintenance work can release air, rust, or sediment into the line.
Before connecting:
- Run the campground water briefly into a clear container.
- Look for sediment, discoloration, or unusual odor.
- Allow visible debris to clear.
- Confirm that the source pressure is appropriate for the RV.
- Connect the regulator, filter, hose, and RV.
- Check every fitting for leaks.
A small inline filter can capture some particles, but a large sediment event may clog it quickly. Travelers who frequently encounter dirty campground lines may benefit from a separate higher-capacity sediment stage.
Maintenance and Cold-Weather Risks

Routine Maintenance
- Inspect fittings before every setup.
- Check for cracks, leaks, and damaged threads.
- Keep caps and clean-water connections protected.
- Store replacement cartridges in a clean, dry place.
- Follow the manufacturer’s flushing instructions.
- Do not clean or backflush a cartridge unless the product permits it.
- Replace seals or washers when damaged.
- Keep untreated fittings from contacting clean-water outlets.
Clogging Risk
When an inline cartridge collects sediment, it can become the bottleneck for the entire RV water system.
Common signs include:
- Lower flow at every fixture
- Shower flow dropping first
- Longer time needed to fill containers
- More noticeable pulsing when another fixture opens
- Flow that returns after the filter is bypassed
If you repeatedly encounter sediment-heavy water, a dedicated sediment stage with greater surface area may be more practical than asking one small inline cartridge to handle the entire load.
Freezing Risk
Water remaining inside a filter can freeze, expand, and damage the housing or media.
In freezing conditions:
- Disconnect the filter.
- Drain it according to the product instructions.
- Store it in a protected, heated location.
- Do not assume a frozen filter remains effective.
- Inspect the housing and fittings before reuse.
- Replace the filter when damage is suspected.
A cracked housing can leak under pressure, while internal media damage may not be visible from the outside.
How to Pick an Inline RV Water Filter
1. Identify the Main Water Problem
Match the filter media to the actual treatment goal:
- Chlorine-related taste and odor: Compare activated carbon media and verified aesthetic reduction claims.
- Visible sediment: Check sediment capacity and consider a separate sediment stage for heavy loads.
- Specific metals or chemicals: Look for exact certified or tested claims.
- Hardness or scale: A standard inline carbon filter is not a water softener.
- High TDS: A standard carbon cartridge is not designed for meaningful dissolved-solids reduction.
- Microbiological concerns: Confirm product-specific testing rather than assuming all inline filters address microorganisms.
2. Confirm Connections
- Garden-hose thread size
- Hose diameter
- RV inlet connection
- Included adapters
- Pressure regulator compatibility
- Installation direction
- Upright-position requirements
3. Compare Flow at a Stated Pressure
A flow number without a pressure value is difficult to compare. Review the conditions under which the rate was measured and remember that cartridge loading can change real-world performance.
4. Plan for Cartridge Replacement
Confirm that replacement cartridges:
- Are currently available
- Match the exact housing
- Can be changed without dismantling the entire setup
- Fit within your travel budget
- Can be stored as a spare
5. Review Certification Carefully
A certification standard does not mean that the filter reduces every contaminant covered by that standard.
Check:
- The exact filter model
- The exact substance
- The certified reduction claim
- The rated capacity
- The supporting test report
- The required operating conditions
When an Inline Filter Is the Wrong Tool
Consider upgrading or changing formats when:
- Taste or odor remains after a new cartridge is installed.
- Testing identifies a concern outside the filter’s claims.
- The filter repeatedly clogs.
- Whole-RV flow becomes unacceptable.
- Sediment remains visible after filtration.
- You stay for long periods at one location.
- Hardness or scale is the main problem.
- High TDS reduction is required.
- Drinking-water quality is the only priority.
Sediment Prefilter Plus Inline Carbon
Separating sediment and carbon filtration can help when particles repeatedly clog the carbon stage.
- The sediment stage handles larger particles.
- The carbon stage focuses on taste and odor.
The combined system still needs enough source pressure and appropriately sized cartridges.
Exterior Canister Filtration
A canister system may suit users who want:
- Larger sediment capacity
- Separate filtration stages
- Longer cartridge stability
- Easier media customization
- More consistent long-term campground use
Interior Drinking-Water Filtration
A dedicated faucet or countertop system may suit users who want targeted drinking and cooking water without restricting shower and toilet flow.
Reverse Osmosis or Water Softening
Reverse osmosis may be considered when reduction of selected dissolved substances is the goal. A water softener may be relevant when hardness and scale are the main problems.
Neither should be treated as a direct replacement for every RV filtration need. Installation space, reject water, regeneration, power, pressure, and maintenance requirements must be considered.

Alternative Drinking-Water Upgrades for Longer RV Stays
An inline RV filter is often the simpler choice for exterior campground connections. If your RV remains parked for longer periods and your priority is dedicated drinking and cooking water, a fixed under-sink reverse osmosis system may be considered when cabinet space, plumbing, feed-water pressure, drainage, faucet installation, and power requirements are compatible.
These systems are not direct replacements for an exterior inline RV filter. They treat water at a dedicated point of use rather than filtering all water entering the RV.
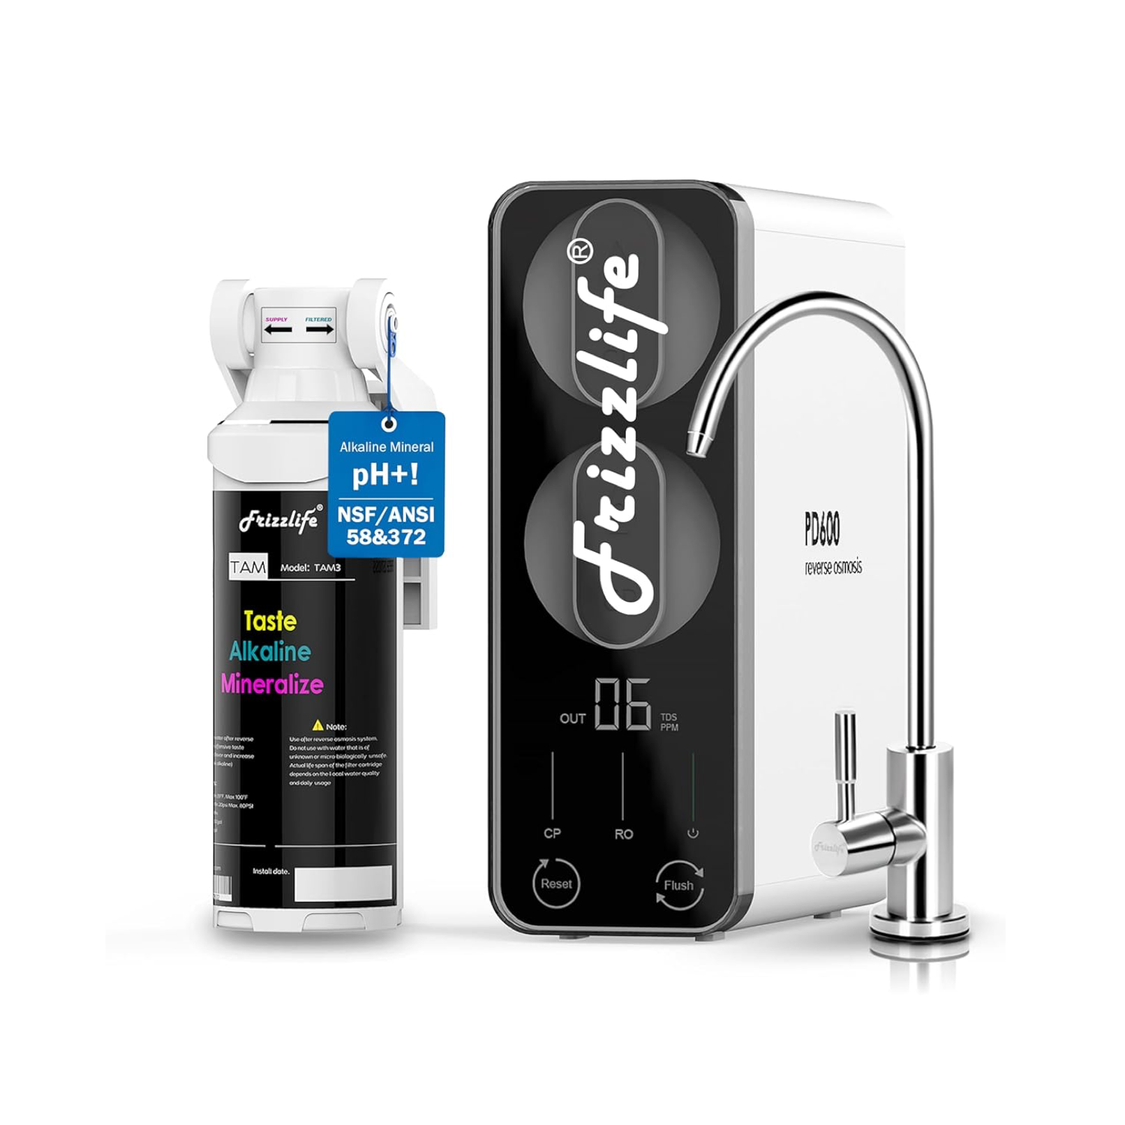
Frizzlife PD600-TAM3
A fixed under-sink reverse osmosis option for longer stays where dedicated drinking and cooking water, tankless installation, remineralization, and point-of-use filtration are priorities.
Confirm cabinet dimensions, countertop drilling, electrical access, feed-water pressure, drain connection, faucet installation, and RV plumbing compatibility before ordering.
View PD600-TAM3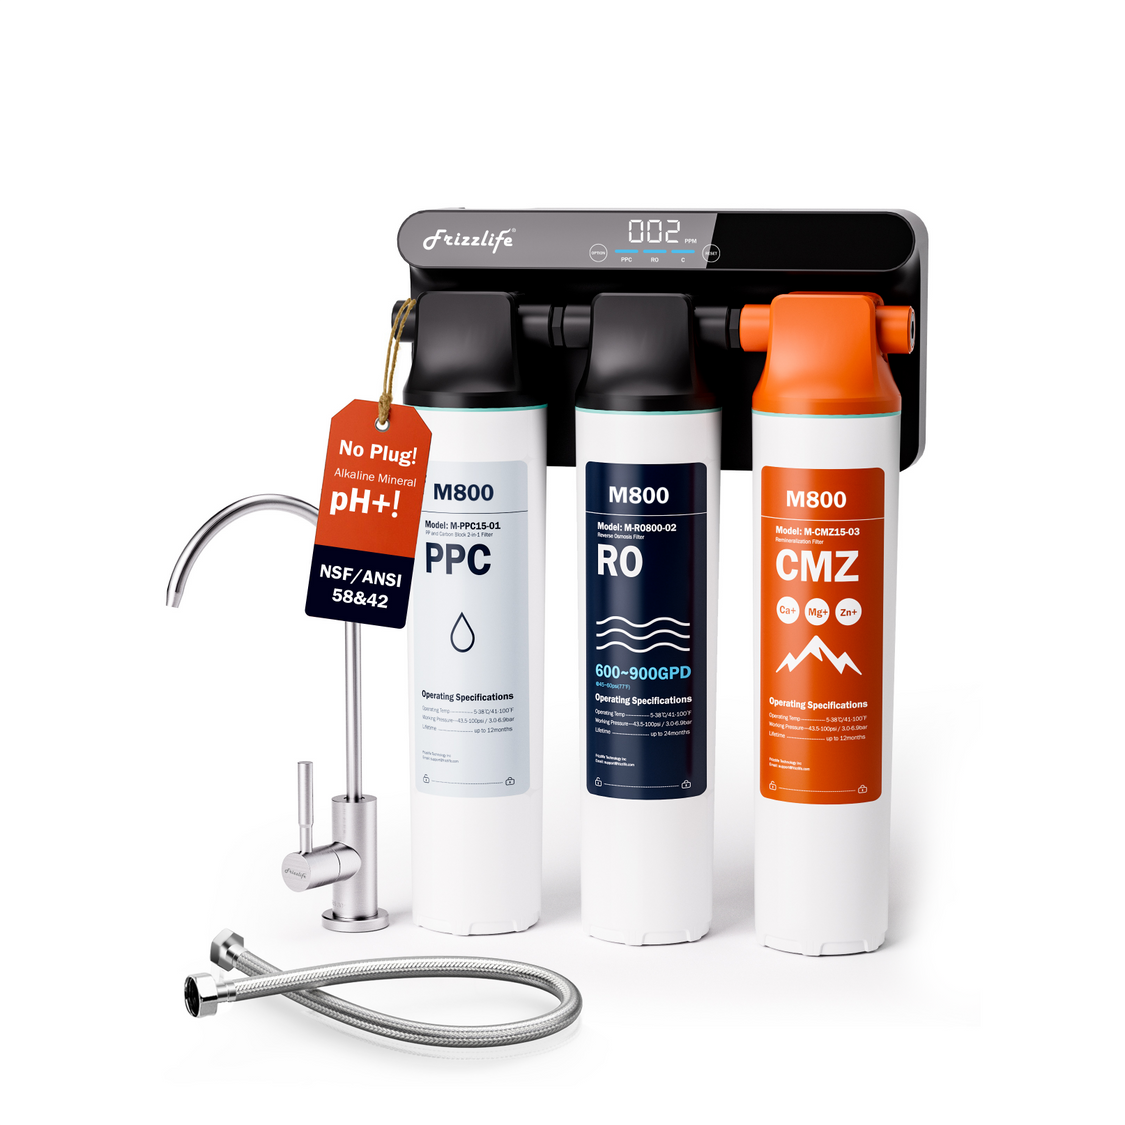
Frizzlife M800
A higher-output fixed under-sink reverse osmosis option for users comparing dedicated drinking-water treatment, tankless installation, remineralization, and a system that does not require an electrical connection.
This is an under-sink point-of-use system, not an exterior RV hose filter. Confirm installation height, water pressure, drain access, faucet clearance, and plumbing compatibility.
View M800
Find Replacement Filters
Replacement cartridges are model-specific. Use the replacement-filter page to find compatible cartridges for Frizzlife reverse osmosis, under-sink, inline, and other filtration systems.
Check the exact system model and filtration stage before ordering. Similar-looking cartridges are not necessarily interchangeable.
Find Compatible FiltersBefore You Buy
- Check whether campground water pressure is already weak.
- Decide whether you are treating all RV water or drinking water only.
- Confirm hose and fitting compatibility.
- Measure installation clearance.
- Check whether the filter must remain upright.
- Review the flow rate at the stated pressure.
- Match the filter media to the actual water problem.
- Confirm exact certified reduction claims.
- Plan for sediment-heavy campgrounds.
- Carry a compatible spare cartridge.
- Use a pressure regulator when required.
- Plan for freezing conditions.
- Confirm replacement-filter availability.
- Do not rely on taste alone when contamination is suspected.
Frequently Asked Questions
How often should I change an inline RV water filter?
Replacement timing depends on the exact cartridge, rated capacity, water quality, total usage, sediment load, storage conditions, and manufacturer instructions.
Inspect the filter earlier when taste or odor returns, flow drops, the cartridge experiences a heavy sediment event, or the filter has been exposed to freezing.
Does an inline RV filter reduce water pressure?
It can. Any filter adds resistance to the water line. The effect depends on incoming pressure, cartridge design, sediment buildup, hose layout, regulator setting, and the number of fixtures in use.
A major flow drop may indicate a clogged cartridge, kinked hose, restrictive regulator, or weak campground supply.
Can I use an inline RV filter for drinking water?
Some inline RV filters are intended for drinking-water applications, but suitability depends on the exact product, source water, certification, and verified contaminant claims.
Do not assume that improved taste means every health-related concern has been addressed.
Do I need a pressure regulator with an inline RV filter?
A regulator may be needed to protect RV plumbing and filtration equipment from excessive campground pressure. Follow the RV, filter, and regulator instructions, and confirm the recommended operating-pressure range.
Will an inline RV filter remove sulfur smell?
A basic carbon inline filter may reduce some odors, but persistent rotten-egg odor can require different treatment media, more contact time, source-water testing, or a different water source.
Do not assume that every carbon cartridge is designed for hydrogen sulfide.
Where should an inline RV water filter be installed?
It can normally be installed near the campground spigot or close to the RV inlet, depending on the product instructions and available space.
The best position preserves hose flow, supports the filter correctly, allows cartridge replacement, and protects fittings from strain.
Can an inline RV water filter freeze?
Yes. Water trapped inside the filter can freeze and damage the housing or media. Drain and store the filter according to the manufacturer’s cold-weather instructions.
Is an inline filter better than an exterior canister system?
An inline filter is normally more compact and easier to install. A canister system generally provides more cartridge space and may handle sediment or multi-stage filtration more effectively.
The better option depends on water quality, available space, desired flow, and travel frequency.
Choose a Filter Based on How It Connects
Inline filters suit compatible RV, appliance, faucet, and hose connections, while camping filters cover a wider range of portable and outdoor formats. Compare the water source, connection method, pressure, flow, maintenance requirements, and exact product claims before choosing.